
So you’ve broken your iPhone 6 screen. No sweat; it happens to the best of us. But now it’s time to fix it, and paying $100 at a Fix Your iPhone store is just not an option on your budget. That’s why we’re here with a step-by-step guide to help you fix your iPhone for less than $50.
You’ll want to have a flat, clean surface to work on. It’s helpful to have tape handy to keep your screws in place and in order. There are quite a few intricate pieces involved. Remember to take your time and be gentle.
Tools you’ll need:
-Phillips #00 screwdriver (you might have to go out and buy this one)
-A wedge-like tool such as a plastic spoon or a guitar pick.
-A pair of tweezers for tactile access
Before beginning, we just want to caution you that this may void any warranty you have on your iPhone, and totallee is not responsible if you break your iPhone.

Step 1
Remove the two Pentalobe screws at the bottom of your iPhone perpendicular to the home button. Use a suction cup on the bottom of the screen, near the home button, to separate the front screen panel from the rest of the iPhone.

Step 2
Separate the bottom of the iPhone (the end near the home button) away from the back, using the top of the iPhone as a hinge. Open it up so there’s a right angle formed between the upright screen-front and the flat back of the iPhone.

Step 3
Using a Phillips #00 screwdriver, remove the two screws holding in the battery connector bracket and use the tweezers to take the bracket out of the phone. Then, wedge the underlying battery connector from its socket and remove it, too.


Step 4
Next, we’re going to remove a host of screws from the front panel cable bracket, which is near the top-right of the phone. Remove the three screws in a triangle shape at the bottom of the bracket; then take out the screw at the top-right and the one at the top-left of the bracket. Finally, remove the bracket.
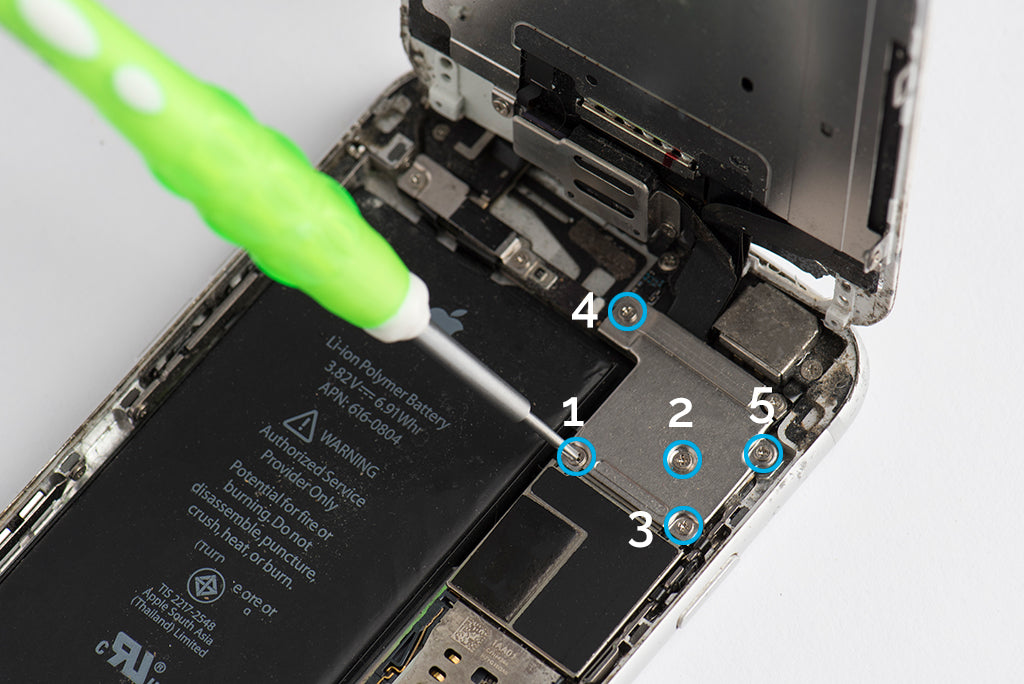
Step 5
Now, we’ll remove the individual cable connectors underneath the bracket. Disconnect the bottom-right home-button cable connector (1), then the top-left display data cable connector (2), and finally the remaining digitizer cable connector (3). At this point, when all the cables are removed, you can now detach the screen-front from the back of the iPhone.* *If your replacement kit comes complete with earpiece, front panel, and front-facing camera and sensor cable, stop here. Follow these steps in reverse order to install the new kit and you’re all done!


Step 6
To transfer over the earpiece speaker, remove the three screws holding in the earpiece speaker bracket, right behind the front-facing camera on the front panel. There should be two screws at the top-left and top-right of the bracket and one at the bottom-right. Remove the bracket and then lift the front-facing camera out of the way of the earpiece speaker so that you can use your tweezers to remove the speaker.


Step 7a
Keep holding the front-facing camera out of the way, and lift the light sensor just beneath it--using its left edge as a hinge--so that you can see the little gold microphone beneath it. Once you wedge the microphone from its adhesive grip to the front-facing panel, you can then remove all three items--the microphone, light sensor, and front-facing camera.


Step 7b
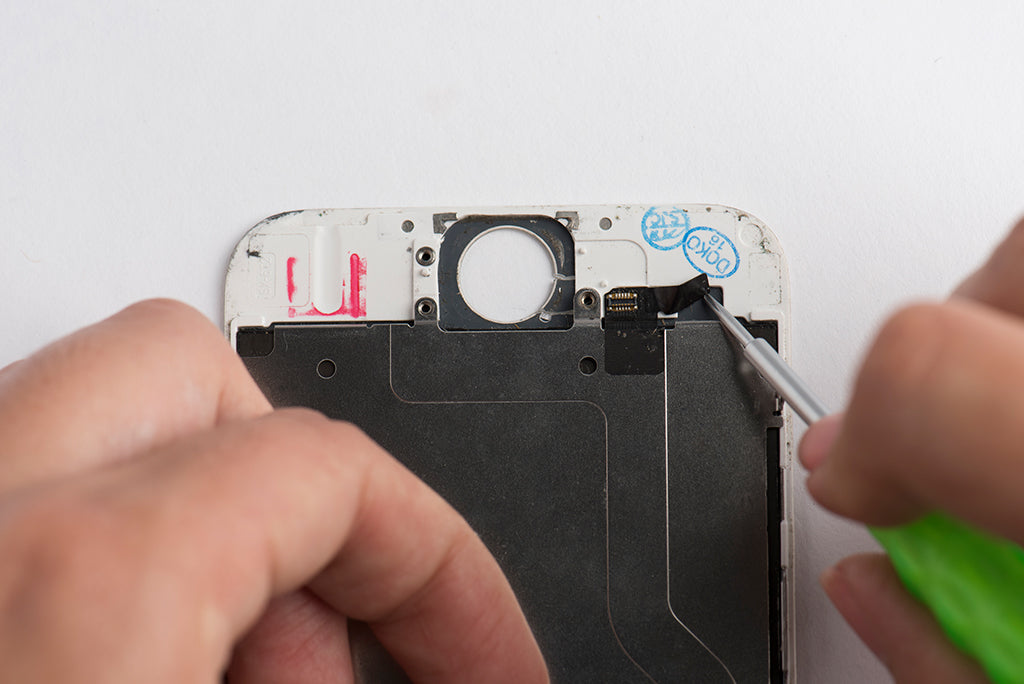
Now, for the home button on the detached screen. This step requires extra care so as not to damage the home button and touch ID functionality. Remove the two screws holding in the home-button bracket--one on the top-left and one on the bottom-right--and then remove the bracket. Use your wedge to remove cable connector to the left of the home button, pushing it up and away from the home button. Next, gently push the home button slightly through from the front of the screen, just enough so that your wedge can pry it away from the back of the front panel. Then slowly separate the home-button cable from its adhesive grip on the front panel.
Remove the home button. Note: if your new screen includes a home button and you do not transfer over the old home button, you will lose your Touch ID functionality.

Step 8
Finally, to remove the LCD shield (the large silver plate on the back of the front panel) unscrew the six screws holding it in place--three on each side of the plate and one on the bottom of the plate (center-right). Now, gently lift the top of the plate up from the front panel, using the bottom of it as a hinge (but do not remove entirely). Then slide your wedge down the back of the LCD panel to slowly detach the home-button cable. Remove the LCD shield.
Remove the home button. Note: if your new screen includes a home button and you do not transfer over the old home button, you will lose your Touch ID functionality.

Step 9
Follow these steps in reverse to reassemble.
Here's a way to avoid cracking your screen: Buy our Screen Protector for extra protection.